Friday, November 29, 2013

DIY BOOKPAGE / SHEET MUSIC WREATH


Hello, dear readers! Hope you all are enjoying a wonderful Thanksgiving holiday.

I'm allowed to post about Christmas decorations now, right?! This wreath is actually from last year, but I never posted about it. The photos were taken in the summer, after the wreath had begun to fall apart... woops.

It was darling during Christmastime, but it's not too holiday-ish, so it was allowed to stay through summer :)


Here's what you need:
  • small circle of cardboard (mine was about 4 inches)
  • masking tape
  • pages from a book
Just roll the pages into cones and tape them in place. Then use rolls of tape to attach a circular layer of cones to the cardboard. Add another layer, then add more to fill in. 

Masking tape is probably not the best bet for long-term attachment. I'd recommend a glue gun if you want the wreath to last a long time. Masking tape lasted me about 6 months before some rolls started falling off. 

Happy holiday decorating!


Friday, November 15, 2013

NOVEMBER DESSERTS & A FALL PLAYLIST

It's falltime, everyone :)

Last week my mom texted me that it's snowing for the first time in my hometown (in Illinois), and I felt pretty sad to be missing it. Sure, months of bitter cold can get unpleasant, but the first snow is just magical.

Meanwhile in Cali I eased my snow-sickness with a falltime stroll through beautifully changing trees. People complain that there aren't seasons here, but it's not true. The leaves on the trees change colors later in the year, and stay colorful longer, so there are practically months of watching red/orange/yellow/purple leaves float to the ground and then crunching through them. Yes, we're lacking the crispness in the air, but I'm mostly over that now :)


Okay onto food. I'm not the biggest pumpkin fan, but I got an urge to eat something really fall-ish (hence these pumpkin-maple-cinnamon cupcakes), which inspired me to share some of my favorite November desserts. All of these are great inspiration for Thanksgiving, of course, whether you're hosting a crowd, staying curled up at home, or have been tasked with bringing dessert to a gathering.


If you're really in a pickle and need a last-minute treat, or if you want to give a homemade gift but don't have a lot of time, I recommend Trader Joe's Pumpkin Bread Mix. It's $2.99, and it's yummy.

You should also check out my Caramel Apple Martini, which deserves to be enjoyed all the way through fall!

Last but not least, I'm sharing a fall playlist. I listen to a ton of music but don't usually make playlists for seasons like this. I've really enjoyed this one for getting me into a fall spirit, though. Hope you enjoy it, too!

If you have Spotify, here's a link to open the playlist in Spotify (it's called "falltime").

If you don't have Spotify, you can enjoy it here!

Wednesday, November 13, 2013

PUMPKIN CUPCAKES with MAPLE-CINNAMON CREAM CHEESE FROSTING


All right, dear readers. I'm not the biggest fan of pumpkin, but Jessica's pumpkin dream cake on The Novice Chef kind of made my mouth water, particularly the cream cheese frosting with maple syrup and cinnamon.


The cake is moist and dense, and it's really perfect with cream cheese frosting. However, if you're in it for the pumpkin, you should know the pumpkin flavor in these cakes is pretty faint. Just enough, and fantastic with the flavors in the frosting.


I'd planned to fill all of the cakes with the frosting (and not frost on top), but I got half way through the minis and stopped because the cake was a little too dense to fill by inserting a tip. So for the ones you see not frosted on top, I cut a conical chunk out of the top, filled it with frosting, and replaced the cone of cake.

As you can see, it looked pretty messy, so I ended up just frosting the rest.

Happy, fall, dear readers. Enjoy!


PUMPKIN CUPCAKES with MAPLE-CINNAMON CREAM CHEESE FROSTING

taken directly from Jessica's pumpkin dream cake over at The Novice Chef, except for the assembly/baking time

Cakes:
3 cups all-purpose flour
1 1/2 teaspoons baking soda
1/2 teaspoon salt
3/4 cup unsalted butter, softened
2 cups granulated sugar
3 large eggs
1 tablespoon vanilla extract
1 (15 oz) can pumpkin
1/4 cup vegetable oil
1 cup milk

Frosting:
12 oz (1 1/2 packages) cream cheese, softened
3/4 cup unsalted butter, softened
3 tablespoons pure maple syrup
2 teaspoons vanilla extract
2 teaspoons cinnamon
6 cups powdered sugar

In a medium bowl, mix flour, baking soda and salt. Set aside. In a large bowl/stand mixer, cream butter and sugar until light and fluffy. Beat in the eggs one at a time, then stir in vanilla, pumpkin and vegetable oil. Beat in the flour mixture alternately with the milk.

Bake at 300°F - standard for 18-20 minutes, mini for 12 - 14 minutes.

For the frosting: In a large bowl, cream butter and cream cheese until smooth. Beat in maple syrup, vanilla and cinnamon. Add confectioners' sugar and beat on low speed until combined, then on high until frosting is smooth.

Thursday, October 24, 2013

DIY FAIRY COSTUME - UPDATED

Hello, dear readers! Are you as excited for Halloween as I am? Sooooo excited!

If you haven't started thinking about a costume yet, don't give up! There are so many great DIY costumes out there you can throw together last-minute. For a quick, cheap one, check out my DIY deer costume post from last week.

I've been thinking about this fairy costume for weeks. I just put it all together this last weekend, and I'm super excited to share it with you. I had soooo much fun putting it together. (I've always wanted to go all out on a fairy costume...)

(Check out my DIY Fairy Wings post for instructions on the wings.)

Man, I love fairies.


All right, without further ado, here's an overview of my fairy costume:
  • A DRESS FROM MY CLOSET, adorned with scarves, some extra tulle, and glittery flora from Michael's (It's this dress, from American Eagle.) 
  • HOMEMADE FAIRY WINGS, made from wire hangers and cheap nylon socks (you know, the ones that come in those little plastic eggs for 30 cents - here's my post with instructions for the wings)
  • FAIRY HEADPIECE, made from glittery flora from Michael's, assembled with wire
Pull a fairy-ish dress out of your closet, and start draping some scarves. If you have time, go buy some tulle. Tulle is perfect for this: you don't need much to give a fairy effect, and you can get a little bit for cheap. I tacked most of the tulle pieces with a needle and thread, using a quick, large stitch that comes out easily. I was also able to attach some of the pieces with a safety pin and hide the pin.


As for the glittery adornments, I used snippings from a few Christmas stems I caught on sale at Michael's. I spent less than 5 bucks on all of it. Regular silk flowers are great, too, of course. You can even paint them!  What about some cheap fake greenery, painted metallic? Metallic spray paint, anyone?

I attached most of the flora with safety pins, and for the rest I used wire.


Okay, the wings. (For details about my wings, you can check out my post about them!) Now, I really enjoyed making these wings, but I did spend a lot of time on them. You can of course go much simpler on the decorating. You could certainly just spray paint them.


The headpiece is simple. I shaped the wire around my head, and wired snippets of glittery floral stems to the main wire. Alternatively, you could make an ear cuff like this one, or just add some flowers to your hair-do ;)


I made one side of the dress off-the-shoulder (pictured above). I hooked a strong, elastic removable bra strap (just regular elastic would work, too) to the dress and lined it up with the real strap, then I positioned it comfortably off my shoulder and attached the lavender scarf loosely to the straps. It stays up perfectly and is comfortable. (This picture reminds me that I have to get rid of that paper clip!)


Hope I've inspired you! Of course I plan to wear sparkly shoes and have some killer fairy makeup. I will try to post pictures of the wearing it :)

Have a great day and rest of your week. Happy Halloweening this weekend!


UPDATE
One year later, as we're nearing Halloween once again, I'm posting a few pictures of me wearing the costume last year (makeup and all) for further inspiration.


Wednesday, October 23, 2013

DIY FAIRY WINGS


Hello, dear readers! I hope you're having a great week. I just finished putting together my fairy costume, and I'm really excited about it. I'll post pictures of the whole costume soon!


I was pleasantly surprised at how easy it was to make beautiful fairy wings. And for less than $4!

Here's what you need:

  • 4 wire hangers
  • 2 pairs of cheap nylon socks (you know, the kind that come in those little plastic eggs for like 30 cents each)
  • twine or strong string
  • masking tape
  • small piece of cardboard
  • several feet of ribbon (for tying the wings onto yourself)
  • paint, glitter/glue, silk flowers, decorations, etc. 
  • pliers 
  • scissors

Like I said, I spent less than $4 on these wings: 30 cents each for 2 pairs of nylon socks (Wal-Mart, but you can get them at Walgreens, too), and $3 for the hydrangea (also Wal-Mart).

With the help of the pliers, untwist and straighten out each of the hangers. Now bend the hangers into wing shapes. Take the top and bottom of one wing, put the corners together, and tie tightly with twine. (If you have ends of hangers poking out of the outline of the shape, you may want to wrap the end with masking tape so it doesn't poke a hole in the nylons.) Next, pull one nylon sock onto each the top and the bottom hanger. Tie at the bottom (like you would tie a garbage bag). Repeat steps with the other wing.

Now put the two wings together, and wrap the center connecting point with twine at every angle. Wrap well until the wings feel secure. You can use masking tape for extra reinforcement.

Now, to reinforce the center of the wings (and to give you a place to mount flowers and other decorations), cut two small cardboard rectangles, one for the front and one for the back. Attach them with masking tape, like this:


Next, cut two very long pieces of ribbon, and tie each around the new cardboard center. The knots should be on the back, and the ribbon should hang down evenly. You'll use these ribbons to tie the wings around your arms.

Now it's up to you to make them beautiful! Use acrylic paint, spray paint, glitter, flowers, rhinestones, and other fairy things. I glitter-fied mine by painting on ModPodge.


Voila! Happy fairy-ing!


For a video tutorial with a similar process, here's a great video from Threadbanger:

Monday, October 21, 2013

TACO AVOCADO MAC & CHEESE

Hello, dear readers! I've got a good 30-minute dinner for you today.

When I first stumbled upon 
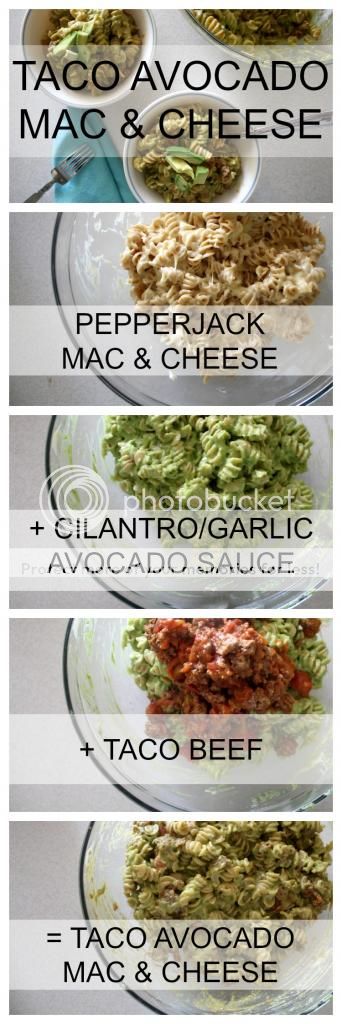
this recipe for avocado mac and cheese, it kind of grossed me out. I don't remember what possessed me to try it, but for some reason I did, and now it's a weekly staple in our apartment. It's delicious. So creamy and cheesy and perfect. Actually, it's my husband's favorite meal now. (That pretty big because normally he complains when we eat meatless.)

As a matter of fact, I want to publicly and officially thank Two Peas and Their Pod for the recipe in the first place. Seriously, awesome. We love it.

I'm surprised I haven't done this sooner, but the other night I added taco meat. Doesn't that sound perfect? I mixed a jar of diced tomatoes in with the meat, and I added lots of extra garlic and cilantro to the avocado sauce. It was really hearty and would make a great meal for a group. Definitely a potluck pleaser. (Keep in mind the avocado sauce is going to get brown after a couple hours, though my husband insists that next-day leftovers taste just as good, despite the yucky color...)

Enjoy! Hope you all have a great week!

TACO AVOCADO MAC AND CHEESE(inspired by this recipe on Two Peas and Their Pod)

PEPPER JACK MAC AND CHEESE
10 ounces pasta (I like to use rotini or elbow macaroni for this dish)
2 T butter
2 T flour
1 cup milk
2 cups shredded Pepper Jack cheese

AVOCADO SAUCE
2 large avocados, peeled and pitted
4 large cloves garlic, minced
1 lime, juiced
1/2 cup chopped fresh cilantro
Salt and pepper, to taste

TACO MEAT
1 lb. ground beef
1 medium onion, diced
1 can diced tomatoes
your favorite taco seasoning*

*I use cumin, chile powder, cayenne pepper, paprika, salt, and a hint of coriander. If you want to use store-bought, I highly recommend Trader Joe's brand. 

First cook the meat:
Heat oil in a saucepan over medium heat. Add onion and cook until translucent. Add beef and seasoning and cook until browned. Stir in tomatoes heat 5 more minutes on medium heat. Then reduce heat to low and simmer while you prepare the rest of the dish. Stir occasionally.

Meanwhile, bring a large pot of water to boil and cook pasta according to package - on the firm side of al dente. DO NOT overcook the pasta. You don't want it to be mushy for this recipe. 

While the pasta is cooking, make the sauces. 
For the avocado sauce: Add all ingredients to a blender and blend until smooth. 
For the cheese sauce: Melt butter in a small saucepan over medium heat. Whisk in flour until it forms a paste. Add milk, turn heat to high, and stir with a whisk. Continue stirring for a minute or two to be sure the paste is incorporated (and doesn't burn on the bottom). Bring to a boil and reduce heat to medium-low, stirring often. When it becomes thick (it doesn't take long at all), stir in the cheese until the sauce becomes creamy.

In a large bowl, stir cheese sauce into pasta, then stir in avocado sauce. Finally, stir in the taco meat. 

Enjoy!

NOTE:
The pepper jack cheese is kind of important. It gives the whole dish that special kick. That said, I have made it with other cheeses plenty of times, and it's still good. If for some reason you don't use pepper jack, ease up a bit on the cilantro and the lime juice. Or maybe season your meat hotter than you normally would. 


Saturday, October 12, 2013

DIY COSTUME INSPIRATION: DEER

Happy October, dear readers!

Happy fall!

Happy Halloween-costume-dreaming time! (yay)

I love Halloween. Actually I love any excuse to costume up. That's why I love theme parties (and I get super into them when I'm a guest... probably too much sometimes...).

I have to say, I've created some pretty rad DIY costumes, from Pocahontas to Mystique (yeah, I painted my whole body blue... it was one of my favorites). Sadly, though, these last few years I didn't find enough spare time or effort to make any elaborate costumes.

Last year, I found a solution which was not at all time or money consuming - painting my face:

DIY deer costume

I stapled (yes, stapled) little brown felt ears to a headband, and voila!

DIY deer costume

This picture is at Buckshot Bar in SF. Haha, it's the only picture I took with my ears :)

It was a ton of fun painting my face each night, and then I just wore something super simple. One night I wore all brown, and another night I wore brown tights with a brown-and-other-earth-tones floral dress. When your face is the real package, the clothes are so easy!

And deer are adorable. Right?

Here's some more:


Have a great Saturday! 

Wednesday, October 9, 2013

DIY LYRICS CANVAS


Have you seen these types of canvas-with-words-painted-on projects floating around Pinterest? Probably. Home decor with words on it is so catchy - I love it. And when they're your own words, well, then how can you resist? Song lyrics, poems, quotes, whatever.


Actually, I have a whole list of words/phrases/lyrics on my computer, just waiting to be incorporated into some kind of decor some day. But I wasn't brave enough to make anything until I found these two large canvases for $5 together at a thrift store. I couldn't just leave them there.

Did I mention they were $5? Together?


So I painted them white (acrylic) ...


... and I painted them again (acrylic)...


... and stenciled lyrics on them (sorry it's difficult to see)...


... and painted them in. Voila.

My letters and lines are kind of crooked (very crooked in some spots). After the first few imperfections I decided I kind of liked it, so I kept it kind of that way (oooooooor I was too lazy to really fix it).


Do you guys know this song? I love it. One of my favorite recordings of it happens to be on YouTube, so I get to share it with you. Please enjoy Ray Charles, dear readers:


Hope your week is going well! Have a wonderful day :)

Saturday, September 28, 2013

TINY ADORABLE HYDRANGEA CAKES


Photo Disclaimer: I tired a new way of compressing my images for this post, and sadly they didn't turn out well at all. Even sadder yet is that I forgot to copy the originals beforehand :( 
I'm sorry for the poor quality of the images... sad day!


I love hydrangeas. They're so bold and striking with their unreal blues and purples, yet there's something so old-fashioned and simple about them. I couldn't pass up these large, beautiful $5 bouquets at farmers' market and ended up with two big vases of them in the apartment. For the first few days, I couldn't help but imagine all kinds of dramatic uses for them. Some combination of my artistic urges and my sweet tooth resulted in these darling little cakes.

Now, beauty and drama aside, hydrangeas are toxic - do NOT eat them! I was pretty careful to have very few petals actually touching the cake. I placed wax paper underneath the large whole flower on top of the tall cake. Of course if I really wanted to be safe, I should have used silk flowers. But, yeah... no one was eating these cakes except my husband and me, and I was pretty sure we'd be okay being careful...


VANILLA CAKE: Nothing special here, just use your favorite recipe. I just doctored up a vanilla cake mix by adding one extra egg and a small package of instant pudding mix to the batter.

BLUEBERRY BUTTERCREAM

1/2 cup blueberries
1 cup butter, softened
3 - 4 cups powdered sugar
2 - 3 tablespoons heavy whipping cream

In a large bowl, mash blueberries with a fork. Add butter and beat well. Gradually add 3 cups sugar and beat until smooth. Stir in whipping cream to combine, then beat for one more minute.

LEMON BUTTERCREAM (for filling)

1 cup butter, softened
3 - 4 cups powdered sugar
1 tsp. vanilla extract
4 teaspoons lemon juice

Combine butter and 3 cups sugar until smooth. Add vanilla and lemon and stir until smooth. Taste, and add lemon juice by teaspoon if needed, to taste. Adjust powdered sugar for consistency.


UA-46365231-1