Showing posts with label DIY. Show all posts

Wednesday, June 25, 2014

LEMON-VANILLA SUGAR SCRUB (AND SALT SCRUB VARIATIONS)

Hi, dear reader. Happy summer! 

I tend to associate dry skin with dry winter, and slathering on moisturizing lotion during cold weather. But summer's the time when I really need to exfoliate. Despite my efforts at protecting my skin from the sun, I always end up with some dry skin. And during the season of sunshine and showing off skin, I want it all to be smooth as a baby's bum. Don't you? That means exfoliation, baby.


Sugar and salt scrubs can get pretty pricey (and the cheaper ones have been pretty yucky in my experience). It's so easy to make them at home, though, and extremely inexpensive. Plus you know exactly what you're putting into it: how much more natural could it get? 

The basic formula is sugar or salt + oil + scents (like essential oils, extracts, herbs, etc.). 


I made this little batch for a friend as a gift. 

By the way, my very favorite moisturizing lotion EVER is Trader Joe's Midsummer Night's Cream. I started using it this year and my skin has never been softer.

LEMON-VANILLA SUGAR SCRUB

1 cup sugar
1/2 cup almond oil (or jojoba, grapeseed, etc.)
1 tablespoon fresh lemon juice
2 teaspoons vanilla extract (or two freshly scraped vanilla beans also do wonderfully)

Stir ingredients together until well mixed. You can add oil as you need to for texture. Store in an airtight container. Rub on skin while in the shower, and rinse well. 

VARIATIONS FOR SUGAR AND SALT SCRUBS:

For the scrubber:
sugar, coarse sugar
table salt, sea salt, kosher salt, epsom salt (depending on how coarse you want)
brown sugar


For the oil:
(All of these contain great nutrients for your skin! :))
almond oil
sunflower oil
jojoba oil
grapeseed oil
avocado oil

Notes about olive oil and coconut oil:

A friend recently directed me to this post about oil cleansing, which warns against using olive oil and coconut oil in skin products, writing that many users have experienced breakouts and irritation. Personally, I've never tried coconut oil in a scrub, but I've come across several recipes that use it. Also, I wonder if it's difficult to scoop out once the oil solidifies. Let me know if you try it! As for olive oil, I've never had a problem with it in scrubs, but I've never tried it on my face. Use your own judgement, and as always, leave a comment to let me know how it went!


For the extras:
essential oils (lavender, lemongrass, rose, jasmine, sandalwood)
extracts (vanilla, peppermint, coconut, almond)
ground dried herbs (lavender, thyme, sage)
citrus zest (lemon, orange, lime; start with about 1 tablespoon per cup of sugar/salt, and adjust from there)

See this article about the five best essential oils for glowing skin.


I'm always experimenting and would love to hear your ideas. Let me know if you try some combination you really love :) Hope you're having a great summer!

Wednesday, February 26, 2014

STAMPED CLOTH NAPKINS (& DIY POTATO STAMPS)


Hi, dear reader!

I'm generally a very floral, flowy, nature kind of person (and our apartment is just like that), but I'm such a sucker for modern, minimalist design and geometric shapes. I have lots of little modern/geo decor ideas collected in the back of my mind, but I've had no way to realize them since our (small) apartment aesthetic is very vintage/rustic. I haven't figured out a way to incorporate the geometric themes I love with the homey, traditional style of our decor.


I was going to stamp up some pretty vintage looking napkins when I realized this was my chance to sneak in some shapes. Napkins!

Perfect.


It was one of those last-minute craft urges - you know, where you have an idea and you HAVE to make it right this very second? But I don't have any stamps. So I pulled out some potatoes, spent about 20 minutes carving, and voila! (Almost) free stamps for my new geometric napkins!


To make potato stamps:
  1. Cut a potato in half (width-wise). 
  2. Insert a cookie cutter about 3/8" into the potato (white part, not skin part), to cut the shape. 
  3. Use a knife and/or your fingers to remove the extra parts, using the cookie cutter cut as a guide.
I used "soft" fabric paint - Washable. Got it at Michael's - some matte and some metallic. 

While stamping, you may get some extra paint around the edges of your shape (squished out when you pressed down on the stamp). Use a Q-tip to dab the extra paint away and smooth out the line. 

After the napkins dried overnight, I washed them in the washing machine, and they came out perfectly well and very soft (not stiff from the paint). 

Happy crafting!

Monday, February 17, 2014

DIY JEAN SHORTS: 3 PAIRS (CUT-OFFS & NO-SEW EMBELLISHMENTS)

Hello, dear reader! I hope you've enjoyed a wonderful holiday weekend. I had plans to go camping with my husband and some friends, but we ended up staying home because half of us were sick! I was bummed, but it gave me a time to do some little DIY projects around the house.

I've had this stack of old jeans taking up space in my closet for months now, waiting to be patched. And I finally faced the facts: if I haven't patched them by now, it's never going to happen.

So I put them in the donation pile.

And quickly took them back out...

Cut-offs!

I didn't sew anything. I used iron-on hem tape. 

1. Thrifted curtain sewn on one leg:
The first pair had some holes up high, so I had to add length. I lengthened them with denim from another pair of jeans, added some floral fabric, and then cuffed them. The fabric is from a curtain I thrifted :) Again, it's all done with iron-on hem tape!


2. Cut off, lengthened, and cuffed:

For this pair, I added some denim to make them longer, then cuffed them. I'd already cut up the legs from this pair for rags (whops), so I ended up adding length with denim from another pair of jeans. The hem looks a little funky, but they look cute on and will be great beach shorts!


3. Un-cuff hem (to lengthen), and lace sewn on one leg:
These are the shorts I never wear because they're a little too short. I finally took a seem-ripper to the cuff, unrolled it, and ironed it out. That extra inch makes a big difference! On a spring-cleaning spree, I pulled a out a lace shirt I never wear, cut it up, and sewed a pretty piece of it onto one of the legs. I love these!


Friday, November 29, 2013

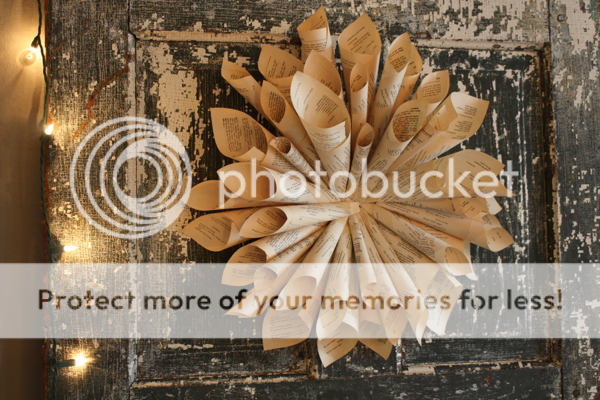
DIY BOOKPAGE / SHEET MUSIC WREATH


Hello, dear readers! Hope you all are enjoying a wonderful Thanksgiving holiday.

I'm allowed to post about Christmas decorations now, right?! This wreath is actually from last year, but I never posted about it. The photos were taken in the summer, after the wreath had begun to fall apart... woops.

It was darling during Christmastime, but it's not too holiday-ish, so it was allowed to stay through summer :)


Here's what you need:
  • small circle of cardboard (mine was about 4 inches)
  • masking tape
  • pages from a book
Just roll the pages into cones and tape them in place. Then use rolls of tape to attach a circular layer of cones to the cardboard. Add another layer, then add more to fill in. 

Masking tape is probably not the best bet for long-term attachment. I'd recommend a glue gun if you want the wreath to last a long time. Masking tape lasted me about 6 months before some rolls started falling off. 

Happy holiday decorating!


Thursday, October 24, 2013

DIY FAIRY COSTUME - UPDATED

Hello, dear readers! Are you as excited for Halloween as I am? Sooooo excited!

If you haven't started thinking about a costume yet, don't give up! There are so many great DIY costumes out there you can throw together last-minute. For a quick, cheap one, check out my DIY deer costume post from last week.

I've been thinking about this fairy costume for weeks. I just put it all together this last weekend, and I'm super excited to share it with you. I had soooo much fun putting it together. (I've always wanted to go all out on a fairy costume...)

(Check out my DIY Fairy Wings post for instructions on the wings.)

Man, I love fairies.


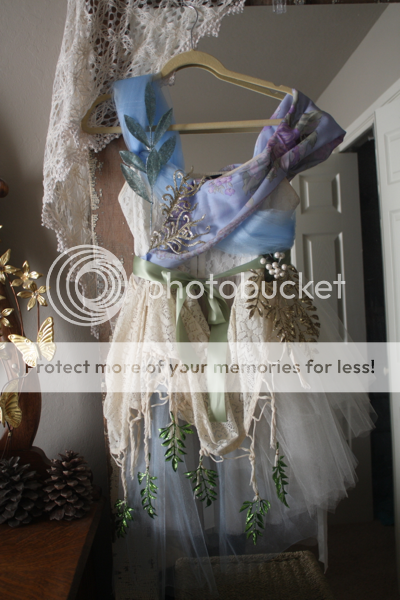
All right, without further ado, here's an overview of my fairy costume:
  • A DRESS FROM MY CLOSET, adorned with scarves, some extra tulle, and glittery flora from Michael's (It's this dress, from American Eagle.) 
  • HOMEMADE FAIRY WINGS, made from wire hangers and cheap nylon socks (you know, the ones that come in those little plastic eggs for 30 cents - here's my post with instructions for the wings)
  • FAIRY HEADPIECE, made from glittery flora from Michael's, assembled with wire
Pull a fairy-ish dress out of your closet, and start draping some scarves. If you have time, go buy some tulle. Tulle is perfect for this: you don't need much to give a fairy effect, and you can get a little bit for cheap. I tacked most of the tulle pieces with a needle and thread, using a quick, large stitch that comes out easily. I was also able to attach some of the pieces with a safety pin and hide the pin.


As for the glittery adornments, I used snippings from a few Christmas stems I caught on sale at Michael's. I spent less than 5 bucks on all of it. Regular silk flowers are great, too, of course. You can even paint them!  What about some cheap fake greenery, painted metallic? Metallic spray paint, anyone?

I attached most of the flora with safety pins, and for the rest I used wire.


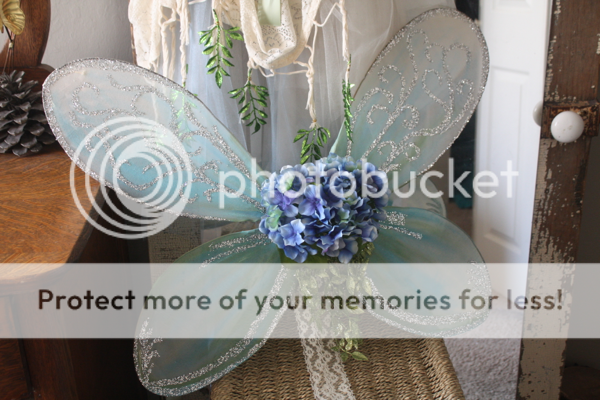
Okay, the wings. (For details about my wings, you can check out my post about them!) Now, I really enjoyed making these wings, but I did spend a lot of time on them. You can of course go much simpler on the decorating. You could certainly just spray paint them.


The headpiece is simple. I shaped the wire around my head, and wired snippets of glittery floral stems to the main wire. Alternatively, you could make an ear cuff like this one, or just add some flowers to your hair-do ;)


I made one side of the dress off-the-shoulder (pictured above). I hooked a strong, elastic removable bra strap (just regular elastic would work, too) to the dress and lined it up with the real strap, then I positioned it comfortably off my shoulder and attached the lavender scarf loosely to the straps. It stays up perfectly and is comfortable. (This picture reminds me that I have to get rid of that paper clip!)


Hope I've inspired you! Of course I plan to wear sparkly shoes and have some killer fairy makeup. I will try to post pictures of the wearing it :)

Have a great day and rest of your week. Happy Halloweening this weekend!


UPDATE
One year later, as we're nearing Halloween once again, I'm posting a few pictures of me wearing the costume last year (makeup and all) for further inspiration.


Wednesday, October 23, 2013

DIY FAIRY WINGS


Hello, dear readers! I hope you're having a great week. I just finished putting together my fairy costume, and I'm really excited about it. I'll post pictures of the whole costume soon!


I was pleasantly surprised at how easy it was to make beautiful fairy wings. And for less than $4!

Here's what you need:

  • 4 wire hangers
  • 2 pairs of cheap nylon socks (you know, the kind that come in those little plastic eggs for like 30 cents each)
  • twine or strong string
  • masking tape
  • small piece of cardboard
  • several feet of ribbon (for tying the wings onto yourself)
  • paint, glitter/glue, silk flowers, decorations, etc. 
  • pliers 
  • scissors

Like I said, I spent less than $4 on these wings: 30 cents each for 2 pairs of nylon socks (Wal-Mart, but you can get them at Walgreens, too), and $3 for the hydrangea (also Wal-Mart).

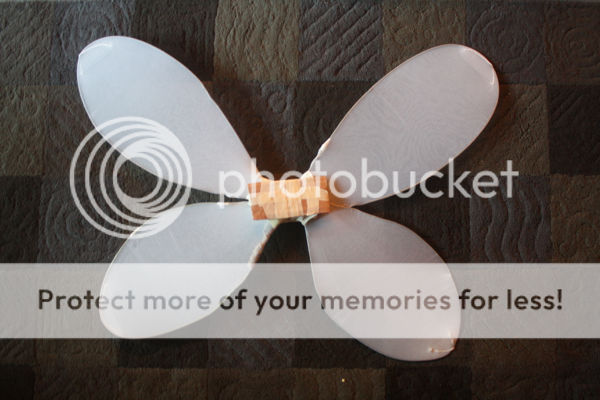
With the help of the pliers, untwist and straighten out each of the hangers. Now bend the hangers into wing shapes. Take the top and bottom of one wing, put the corners together, and tie tightly with twine. (If you have ends of hangers poking out of the outline of the shape, you may want to wrap the end with masking tape so it doesn't poke a hole in the nylons.) Next, pull one nylon sock onto each the top and the bottom hanger. Tie at the bottom (like you would tie a garbage bag). Repeat steps with the other wing.

Now put the two wings together, and wrap the center connecting point with twine at every angle. Wrap well until the wings feel secure. You can use masking tape for extra reinforcement.

Now, to reinforce the center of the wings (and to give you a place to mount flowers and other decorations), cut two small cardboard rectangles, one for the front and one for the back. Attach them with masking tape, like this:


Next, cut two very long pieces of ribbon, and tie each around the new cardboard center. The knots should be on the back, and the ribbon should hang down evenly. You'll use these ribbons to tie the wings around your arms.

Now it's up to you to make them beautiful! Use acrylic paint, spray paint, glitter, flowers, rhinestones, and other fairy things. I glitter-fied mine by painting on ModPodge.


Voila! Happy fairy-ing!


For a video tutorial with a similar process, here's a great video from Threadbanger:

Saturday, October 12, 2013

DIY COSTUME INSPIRATION: DEER

Happy October, dear readers!

Happy fall!

Happy Halloween-costume-dreaming time! (yay)

I love Halloween. Actually I love any excuse to costume up. That's why I love theme parties (and I get super into them when I'm a guest... probably too much sometimes...).

I have to say, I've created some pretty rad DIY costumes, from Pocahontas to Mystique (yeah, I painted my whole body blue... it was one of my favorites). Sadly, though, these last few years I didn't find enough spare time or effort to make any elaborate costumes.

Last year, I found a solution which was not at all time or money consuming - painting my face:

DIY deer costume

I stapled (yes, stapled) little brown felt ears to a headband, and voila!

DIY deer costume

This picture is at Buckshot Bar in SF. Haha, it's the only picture I took with my ears :)

It was a ton of fun painting my face each night, and then I just wore something super simple. One night I wore all brown, and another night I wore brown tights with a brown-and-other-earth-tones floral dress. When your face is the real package, the clothes are so easy!

And deer are adorable. Right?

Here's some more:


Have a great Saturday! 

Wednesday, October 9, 2013

DIY LYRICS CANVAS


Have you seen these types of canvas-with-words-painted-on projects floating around Pinterest? Probably. Home decor with words on it is so catchy - I love it. And when they're your own words, well, then how can you resist? Song lyrics, poems, quotes, whatever.


Actually, I have a whole list of words/phrases/lyrics on my computer, just waiting to be incorporated into some kind of decor some day. But I wasn't brave enough to make anything until I found these two large canvases for $5 together at a thrift store. I couldn't just leave them there.

Did I mention they were $5? Together?


So I painted them white (acrylic) ...


... and I painted them again (acrylic)...


... and stenciled lyrics on them (sorry it's difficult to see)...


... and painted them in. Voila.

My letters and lines are kind of crooked (very crooked in some spots). After the first few imperfections I decided I kind of liked it, so I kept it kind of that way (oooooooor I was too lazy to really fix it).


Do you guys know this song? I love it. One of my favorite recordings of it happens to be on YouTube, so I get to share it with you. Please enjoy Ray Charles, dear readers:


Hope your week is going well! Have a wonderful day :)

Friday, September 13, 2013

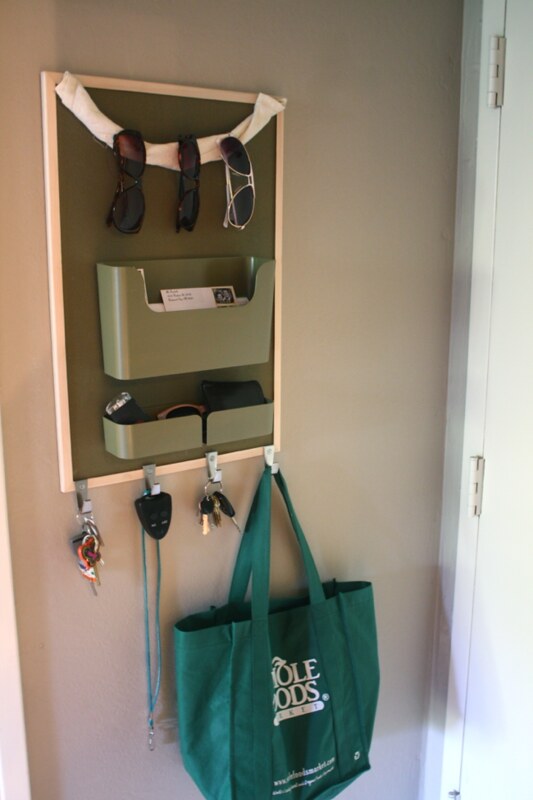
DIY MAIL ORGANIZER & STORAGE BOARD


Hello, dear readers. Hope you're doing great! Just a quick little weekend project to share with you: this mail organizer/storage board. It's not too glamorous, I know, but it happens to be pretty hidden in our apartment. And the sage color really is pretty in person, even though it looks kind of gross in my extremely sub-par photos. 

Anyway it's amazingly useful. 

Plus, it was much cheaper than buying something like it. 

(That little black remote is actually our light switch. And now it's actually on the wall by the door! Yep, it's a big step up from sitting on the kitchen counter.)

Now I'm going to tell you the long version of the story because I'm proud of it, and because I'm kind of in love with organization (my life is full of post-its). A few months ago, I eliminated our junk drawer and catch-all spot. My thinking was: if you designate a spot for junk, it's inevitably going to be FILLED with JUNK. But if you don't, then you will either be forced to find a spot for something/throw it away OR the thing will clutter up your space, and you'll eventually clean it up (as opposed to hiding it away where you don't have to deal with it). Believe it or not, it has totally worked. Now our "junk drawer" contains ONLY things we use regularly (and a few miscellaneous occasional-type odds and ends). You can do it, too!

But we still had the regular, everyday-object clutter, which can become so annoying when trying to clean up the apartment. 

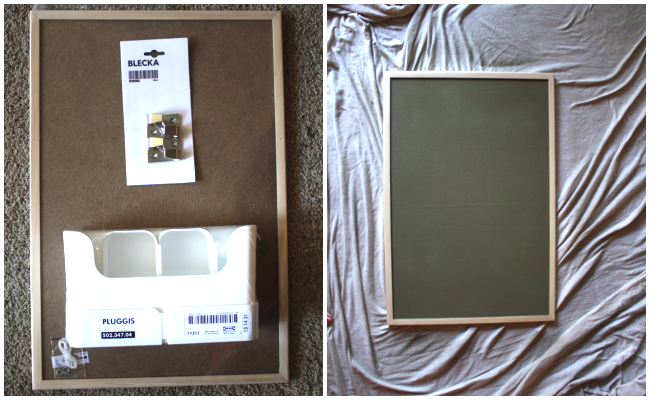
So after a few minutes of Pinterest and Google Images re: organization, I made an early morning trip to Ikea and Home Depot. I came back with this stuff, and some sage spray paint. 


It's now tucked perfectly out of the way behind/by the door. We use it for keys, wallets, mail stuff, bike stuff, shopping stuff (and any other lonely clutter that needs a last-minute home when people are coming over). It's been up for a few weeks now, and we really use it (I more than my husband, admittedly). High five for a successful de-cluttering project! (Those are rare, are they not?)

Happy de-cluttering! Hope you have a WONDERFUL weekend :)


UA-46365231-1