Hello you dearest, darlingest readers, you! It's a big announcement today, and you're the first to know!
INSPIRE ME THRIFTY IS MOVING!
And it's getting a new name: "a.b.daisy."
(I know. I'm sorry. I'm not supposed to go changing my blog like that, but of course things don't always go the way you've planned.)
New name. New look.
Same content. Pretty much.
You see, dear reader, when I started this blog, I had just graduated from college, gotten married, moved across country, and started a new job. That's a good bit of transitioning and adjusting to do. Though I had lots of plans for IMT, the blog took me in a completely different direction than I'd planned. For example, when I started the blog, I thought posting about food would be sort of an afterthought: I loved to bake but basically never cooked. But now that I live in sunny California where everything grows, with farmers' markets and beautiful fresh foods all around me, I LOVE cooking and posting about recipes. For another example, when I started the blog I was planning a handmade wedding, so I was thrifting and taking on repurposing projects like nobody's business. But now that I have a teeny apartment and no more weddings coming up, I haven't invested as much time in those kinds of projects. All things considered, "Inspire Me Thrifty" doesn't fit the bill like it used to.
Basically, I'll be posting about the same things, but the blog itself will be a little better suited for the content :)
Ch-ch-ch-ch-changes!
I'll keep you updated, and you keep your eyes out for more news. Sound good? :)
Thanks for reading!

Monday, April 29, 2013
Sunday, April 21, 2013
Be Back in a Week!
Hello, dear reader! Hope you're enjoying a wonderful weekend!
My MOM is visiting me from Illinois for a whole week (yay!), so I decided to take that time off from the blog. I will be back next week, and I've got some exciting news for you when I return!
Mom and I have lots of plans - from bananas foster and Italian cooking to patio gardening and painting furniture - so keep your eyes out for some posts from her visit when I get back to the blog.
See you next week!
P.S.
Yesterday Mom and I paid a little visit to Big Basin Redwoods State Park for some quiet forest time under the most magical trees. And the weather was perfect! I'll leave you with a few photos of the trip:
Tuesday, April 16, 2013
GARLIC CHIVE HUMMUS

I'm always seeing hummus recipes around the web and in food magazines, and I'm always clipping them to tuck away in my mental file of to-do recipes in the back of my wide-eyed foodie brain. For the longest time, though, I was too [lazy? scared?] to actually try making hummus. "Tahini? What the heck is that?" So you know, I just kept the hummus file shut.
Here's the thing about hummus in this apartment, though. We buy it. We get it home from the grocery store. Nate takes it to the couch with chips or veggies. Ten minutes later, it's gone.
Always.
Sometimes, I even hide it in the back of the fridge to be sure I get some for myself.
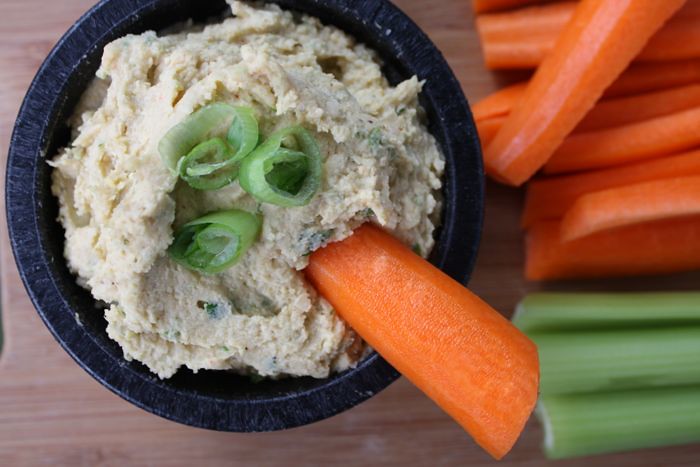
Besides being delicious, hummus is so versatile and good for your soul! But one thing hummus is not: cheap. (Well, especially when your husband eats it all in one sitting.) So that was my kick in the butt to try making it myself: it's much cheaper. And now that I've done it once, I do it all the time. It's fresh, easy, delicious, and totally worth the pennies pinched!
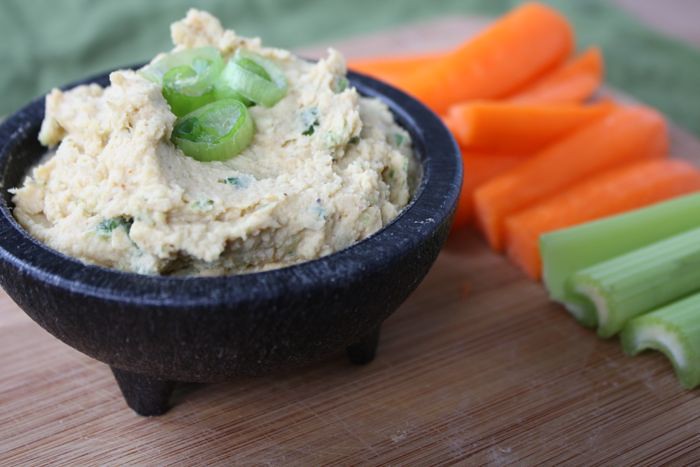
Garlic Chive Hummus
Makes about 2 cups.
1 can garbanzo beans
3 tablespoons lemon juice
2 tablespoons tahini
1 tablespoons olive oil*
1 garlic clove, minced
3 green onions, chopped
salt and pepper, to taste
cayenne pepper (optional)
*I usually blend the olive oil right into the hummus, but you may choose to wait and pour the olive oil over the top of the hummus before serving.
Drain and rinse garbanzo beans, reserving ~2 tablespoons liquid. Combine garbanzo beans, reserved liquid, lemon juice, tahini, oil, and garlic in blender or food processor. (I use an immersion blender.) Stir in salt, pepper, cayenne pepper, and green onions. Blend just a few pulses more.
Taste. Adjust lemon juice and tahini to your flavor/consistency preference.
Keeps in fridge for about 10 days.
Friday, April 12, 2013
KALE-LEEK BROWN RICE SKILLET
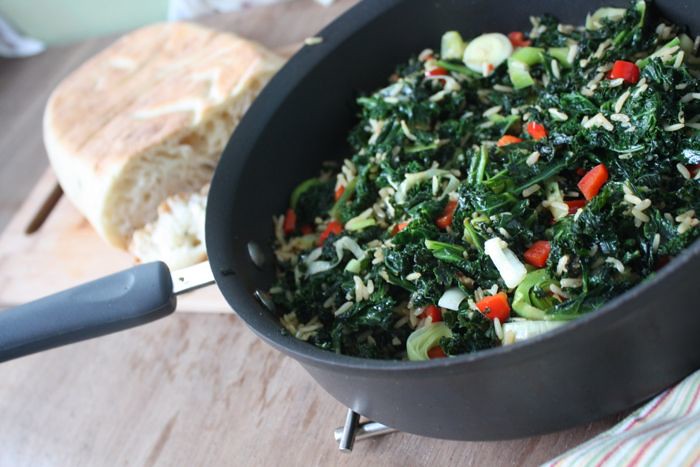
When a recipe is quick, tasty, filling, and loaded with veggies, how can you pass it up? I don't know about you, but I could use plenty more of them for weeknight dinners.
Since I blogged about my overabundance of green produce this week, I thought I'd write up a quick little post about this one-pot improvisation I cooked last night. Got home, looked in the fridge, and needed to use a whole bunch of kale, two leeks, and a red pepper. So here's what I did.
It was really yummy, actually, in a very green kind of way. I'd just picked up a beautifully fragrant herb slab (pictured below), and it paired very nicely with the kale dish. Mmm, fresh dinners are fantastic.
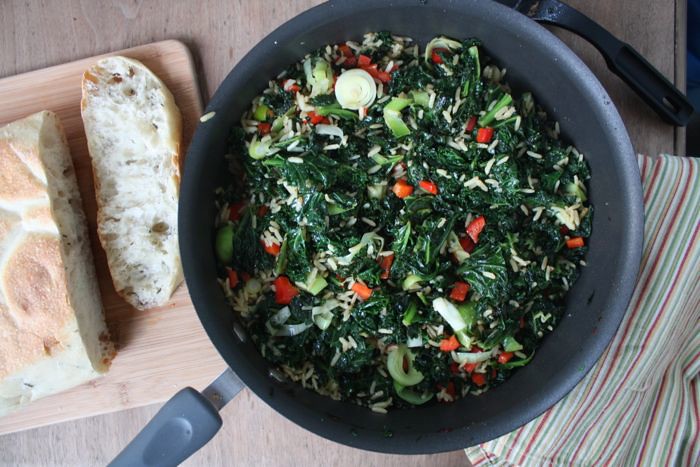
Kale Skillet with Leeks and Rice (or something)(serves 3 - 4)
8 - 10 cups coarsely chopped kale, hard stems removed2 leeks, sliced
half a red bell pepper, chopped
olive oil
1 1/2 cups brown rice, cooked
black pepper
Sautee the kale in olive oil until wilted. (I had to add a little at a time because my skillet didn't hold all of the kale raw.) When most of the kale has wilted, add leeks and red pepper. Sautee a few more minutes until leeks and peppers are tender. Stir in rice and sprinkle with black pepper. Drizzle with some more olive oil and continue to cook, about 5 more minutes. Stir occasionally.
Note: As you can see, the kale is the main event, not the rice. You may want to add more rice to make it more filling. Or just to make it less kaley, depending on how much kale you can eat in one sitting :)
Thanks for reading!
Tuesday, April 9, 2013
CREAM OF BROCCOLI SOUP (EASY)

Hello, dear reader. Happy Tuesday :)
I've been going meatless more and more often these days. I used to be a vegetarian (for >6 years), and my body always felt so great when I wasn't eating meat. Since then my diet has included increasing amounts of meat, and I think it's time to cut back. Don't be fooled: I'm all for meat. But less is more. Especially when you're on a budget - good meats are expensive! And cheap meats, well... there are some things you just don't want to put in your body, even on a student's budget.
It's a little added challenge for me that I'm generally cooking for two, and the other person is a meat-and-potatoes eater to the core. He always pouts when there's no meat. (Sometimes it's cute.) He also eats an enormous amount of food. Enormous. And, dear reader, he's super lean. Living with a roommate like that is not a girl's best friend when it comes to staying in shape.
Assuming things go well, you can expect plenty more vegetarian posts coming your way.
This week I went a little crazy with great-looking green produce, and I've got all kinds of green things in my fridge right now. Broccoli, leeks, kale, zucchini, lettuce. And tons. I did have some recipes in mind when I bought all of it, but the rest of this week will definitely be one big challenge to somehow enjoy all of it before it passes its prime.
Whops.
So far so good. This soup is basically a broccoli-leek-potato puree with cream. It's quick and simple (enough for a weeknight - even a Monday). It's super filling and keeps well in the refrigerator (I packed leftovers for lunch).
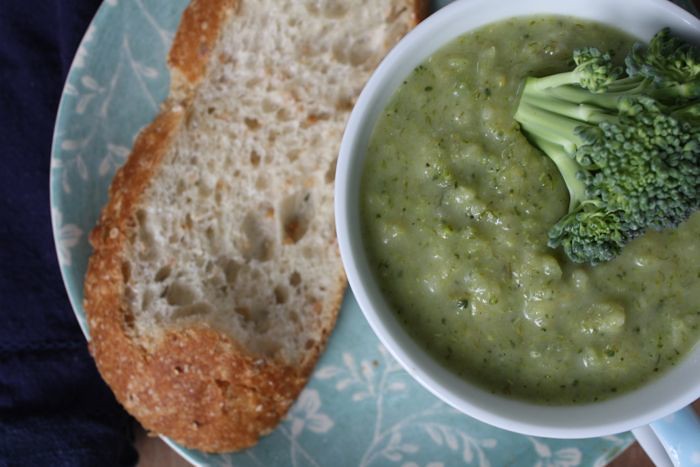
The recipe comes from a cookbook I recently added to my shelf: Food Network Magazine's 1000 Easy Recipes: Super Fun Food for Every Day. I'm planning to post several posts with recipes from the book and eventually write up a review. Hope you enjoy it!
Cream of Broccoli Soup
3 cups sliced leeks3 cups peeled and cubed potatoes
1 garlic clove, sliced
salt and pepper
1/2 tsp. thyme
1/2 tsp. nutmeg
5 cups chicken broth
3 cups broccoli
1 cup cream
Sauté leeks and potatoes in olive oil or butter. Add garlic, salt, pepper, thyme, and nutmeg. Cook 5 minutes. Add chicken broth and boil until potatoes are tender. Add broccoli and simmer 5 minutes. Puree the soup, then stir in cream and reheat.
Saturday, April 6, 2013
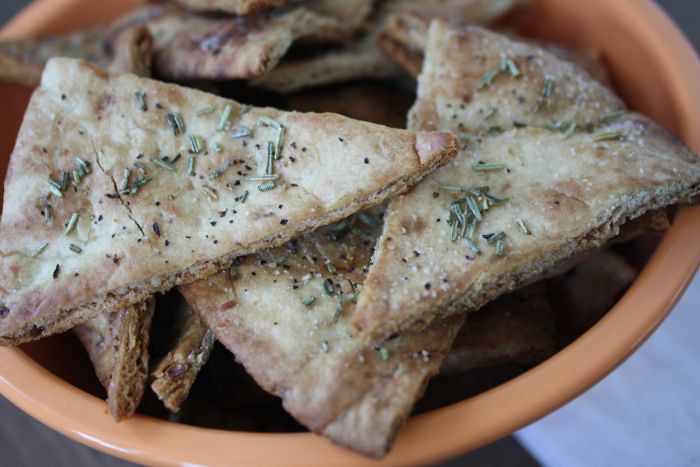
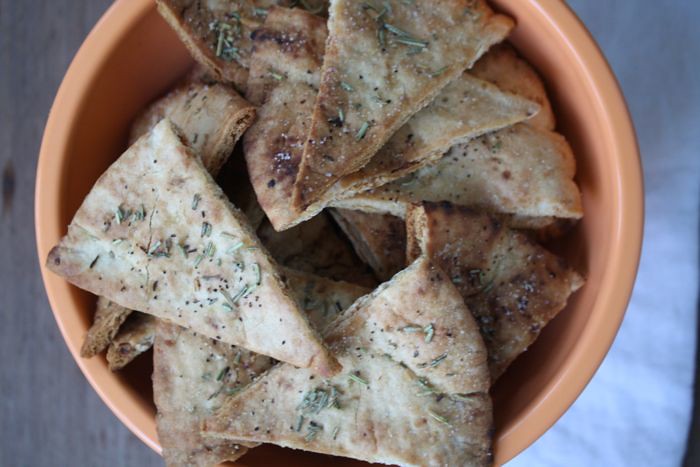
ROSEMARY-GARLIC PITA CHIPS
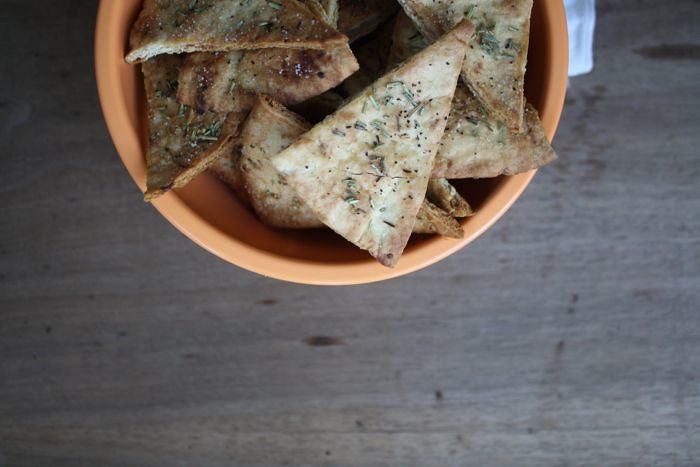
Lately I've been trying to eat three smaller meals with two good, healthy snacks during the day. I always feel better fueled that way, but finding snacks that are tasty and fill me up isn't always easy. Usually I reach for fruit or yogurt, but sometimes you need a dry/crunchy fix, you know? Well this is it for me!
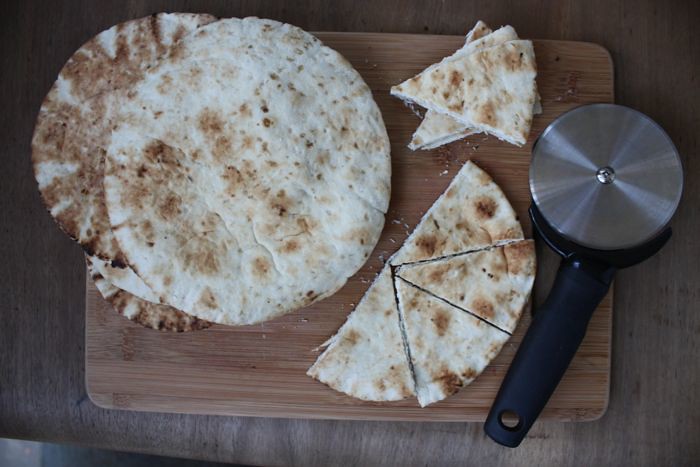
It was an accident that I ended up making these. We had a whole package of whole wheat pita bread hiding in the back of the fridge, and it was a little hard by the time I discovered/remembered it. So I cut it up, brushed it with olive oil, and sprinkled it with the first tasty combination I thought of: garlic salt and dried rosemary.
They turned out beautifully! I've been taking a little bag of them to work for a mid-morning snack. They're easy to make, of course (especially if you line the baking sheets so you don't have dishes to do!). I don't know if I'll make them all the time, but I'm definitely sticking them in my party food file. Throw them on a plate with some hummus, and you've got a party right there.
Rosemary-Garlic Pita Chips (Baked)
6 pita bread rounds (I used whole wheat)olive oil for brushing
garlic salt (fine salt sticks better than course salt)
black pepper
dried rosemary
Preheat oven to 350 degrees. Using a pizza cutter or kitchen scissors, cut each pita bread into 8 triangles (like a pie). Arrange triangles on lined baking sheets and brush both sides with olive oil. Sprinkle generously with garlic salt, then sprinkle with pepper and rosemary.
Bake 15 - 20 minutes or until golden. (Check them often after 12 minutes or so to be sure they don't burn).
Tuesday, April 2, 2013
TEX-MEX BURGER (WITH BLACK BEAN GUAC)
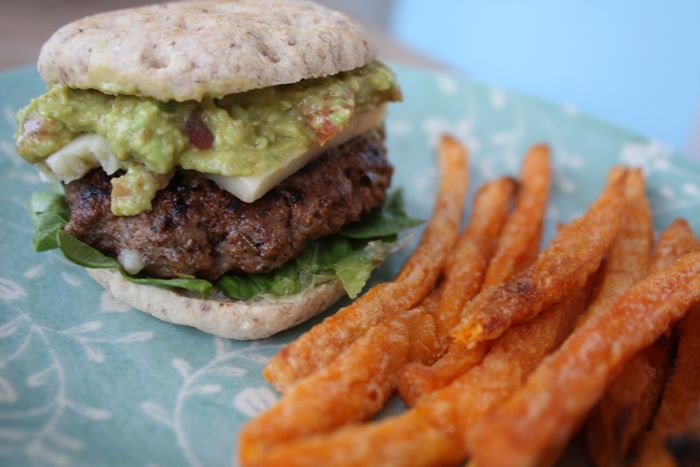
Well, dear reader, we've reached the fourth and final recipe in this little series from my burger test kitchen: the Tex-Mex. In keeping with my "international" theme, I probably could've branched off the continent for my final burger. But seriously, who can turn down Mexican food?
In case you've missed the other recipes from the test kitchen, you can find them here:
The Greek: Spinach-Feta Lamb Burgers (with garlic-dill yogurt sauce)
The Moroccan: Moroccan-Style Burgers (with spiced ketchup)
The American: Bacon-Apple Blue Cheese Burger (with sweet and tangy mayo)
This Tex-Mex burger is a perfect marriage of Mexican and American good-time foods. Mix ground beef with green chiles and steak sauce, then top the burgers with a spicy and refreshing guac. Perfection, I think. I placed this burger in second place, after The American. One of my taste testers placed it first, but in a tie with the American.
Here we go: The Tex-Mex.
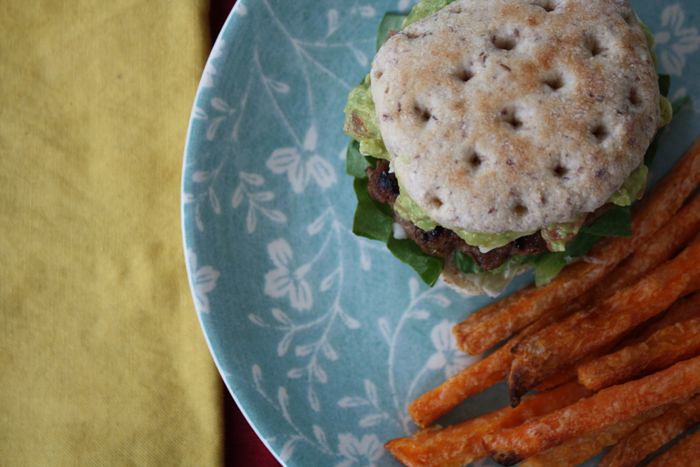
Tex-Mex Burger with Black Bean Guac
Burger portion of this recipe adapted from KraftRecipes' Texas-Style Burgers.Makes 8 sliders (or 4 regular-sized burgers).
1 pound ground beef
1/2 cup steak sauce
1 small can (4-oz.) chopped green chiles
1/2 teaspoon seasoning salt
sliced pepperjack cheese
1 recipe black bean guacamole (below)
hamburger buns for serving
romaine lettuce for topping
Combine beef, steak sauce, chiles, and seasoning salt. Form into 4 equal patties. Cook over medium-high heat on non-stick skillet until desired doneness. Just before burgers are done: top with slices of pepperjack cheese, reduce heat to low, and cover. Cook until cheese is melted.
Serve on buns with lettuce, tomato, and black bean guacamole.
Black Bean Guacamole
1/2 cup black beans2 large avocados
1 lime, juiced
1/2 teaspoon salt
1/2 teaspoon cayenne pepper
1/2 teaspoon cumin
1 garlic clove, minced
2 Roma tomatoes, chopped
1/2 cup onion, diced
2 tablespoons chopped fresh cilantro
Cut avocado in half lengthwise and remove seed. Using a large spoon, scoop the meat out of the skin.
In a small bowl, mash black beans and lime juice loosely with a fork. Add avocado, salt, cayenne, cumin, and garlic. Mash together until avocado is smooth. Stir in tomato, onion, and cilantro.
For the most flavor, cover and let sit 30 minutes before serving.
Note: Don't omit the lime or cilantro. Both will balance out the spiciness, and lime will delay the avocado from browning.
Subscribe to:
Posts (Atom)