Wednesday, February 26, 2014

STAMPED CLOTH NAPKINS (& DIY POTATO STAMPS)


Hi, dear reader!

I'm generally a very floral, flowy, nature kind of person (and our apartment is just like that), but I'm such a sucker for modern, minimalist design and geometric shapes. I have lots of little modern/geo decor ideas collected in the back of my mind, but I've had no way to realize them since our (small) apartment aesthetic is very vintage/rustic. I haven't figured out a way to incorporate the geometric themes I love with the homey, traditional style of our decor.


I was going to stamp up some pretty vintage looking napkins when I realized this was my chance to sneak in some shapes. Napkins!

Perfect.


It was one of those last-minute craft urges - you know, where you have an idea and you HAVE to make it right this very second? But I don't have any stamps. So I pulled out some potatoes, spent about 20 minutes carving, and voila! (Almost) free stamps for my new geometric napkins!


To make potato stamps:
  1. Cut a potato in half (width-wise). 
  2. Insert a cookie cutter about 3/8" into the potato (white part, not skin part), to cut the shape. 
  3. Use a knife and/or your fingers to remove the extra parts, using the cookie cutter cut as a guide.
I used "soft" fabric paint - Washable. Got it at Michael's - some matte and some metallic. 

While stamping, you may get some extra paint around the edges of your shape (squished out when you pressed down on the stamp). Use a Q-tip to dab the extra paint away and smooth out the line. 

After the napkins dried overnight, I washed them in the washing machine, and they came out perfectly well and very soft (not stiff from the paint). 

Happy crafting!

Monday, February 17, 2014

DIY JEAN SHORTS: 3 PAIRS (CUT-OFFS & NO-SEW EMBELLISHMENTS)

Hello, dear reader! I hope you've enjoyed a wonderful holiday weekend. I had plans to go camping with my husband and some friends, but we ended up staying home because half of us were sick! I was bummed, but it gave me a time to do some little DIY projects around the house.

I've had this stack of old jeans taking up space in my closet for months now, waiting to be patched. And I finally faced the facts: if I haven't patched them by now, it's never going to happen.

So I put them in the donation pile.

And quickly took them back out...

Cut-offs!

I didn't sew anything. I used iron-on hem tape. 

1. Thrifted curtain sewn on one leg:
The first pair had some holes up high, so I had to add length. I lengthened them with denim from another pair of jeans, added some floral fabric, and then cuffed them. The fabric is from a curtain I thrifted :) Again, it's all done with iron-on hem tape!


2. Cut off, lengthened, and cuffed:

For this pair, I added some denim to make them longer, then cuffed them. I'd already cut up the legs from this pair for rags (whops), so I ended up adding length with denim from another pair of jeans. The hem looks a little funky, but they look cute on and will be great beach shorts!


3. Un-cuff hem (to lengthen), and lace sewn on one leg:
These are the shorts I never wear because they're a little too short. I finally took a seem-ripper to the cuff, unrolled it, and ironed it out. That extra inch makes a big difference! On a spring-cleaning spree, I pulled a out a lace shirt I never wear, cut it up, and sewed a pretty piece of it onto one of the legs. I love these!


Monday, January 13, 2014

Perfect Ranch Cheesy Chex Mix


Hello, dear readers!

Are you a chex mix person? I've always associated it with the holidays, since my mom makes huge batches of baked garlic chex mix at Christmastime. It sits around in bowls which somehow refill themselves and makes the most perfectly cozy vacation snack.

Plus, chex mix makes a great gift. And not just during holiday time!

After filling up on the baked garlic stuff this holiday season, my mom and I had an urge to get some ranch action in for a next batch. I combed through many recipes for cheesy ranch chex mix, read many reviews, and created this one. I love it. Hope you enjoy it!


Perfect Cheesy Ranch Chex Mix

makes 11 cups

2 cups goldfish crackers (cheddar)
2 cups cheese-its (cheddar - parmesan duo)
2 cups oyster crackers
1 cup small pretzels (I like the square, lattice/grid shape the best)
2 cups corn chex
2 cups rice chex

1/4 cup butter, melted
1 pkg. (1 oz.) Ranch dip or dressing mix (I've used both - either is fine!)

Combine crackers, pretzels, and cereal in a large bowl. Pour about half of the melted butter over the mixture, then sprinkle about half of the Ranch mix. Stir to coat. Repeat with remaining butter and Ranch mix. Store in an airtight container for up to 2 weeks.

Makes a great gift or party snack!


Friday, January 10, 2014

LITTLE BEE HIVE CAKE


Happy New Year, dear readers! I hope you've enjoyed a lovely holiday season.

I'm sorry I was away so long.

But I have a really cute cake to share with you.


For Nate's birthday, I'm all about the themed desserts.

Last year it was robots.


The year before that, it was video games. (If you haven't played the game Portal, I recommend it, and I don't play video games often.)


This year, it's bees. Yes, he loves bees. I mean, bees ARE awesome, aren't they? Our world would be a lot uglier and less delicious without them.

This would be so sweet for children's parties and birthdays. I have a friend who is thinking of using bees as a theme for her daughter's second birthday this month - how cute would that be? :)


BEE HIVE CAKE INSTRUCTIONS

This cake was for only two people (a quick, weeknight celebration kind of thing), so it's small. For this small cake, I used:
  • 4-inch round cake pan (mine is spring form, doesn't have to be)
  • 3-inch glass pyrex bowl
You can adjust the sizes according to what you have in your kitchen/how big your bee hive is going to be. I had all kinds of bowls and pans out, mixing and matching for a while until I found the right match. Just be sure your bowl is oven safe! 

I actually baked 4 pieces - 2 of the small round cakes, and 2 bowls - just to have a backup for each piece in case one didn't come out right or I made a mistake during assembly. Let the pieces cool thoroughly before assembling the cake. 

Assemble the cake just as you would a layer cake, with the bowl-shape cake upside down as the top layer. 
  1. Level and shape the cake. Use a serrated knife to trim up both pieces until you get the shape you want. 
  2. Put a thick layer of frosting in between the two pieces. 
  3. Apply a crumb coat. 
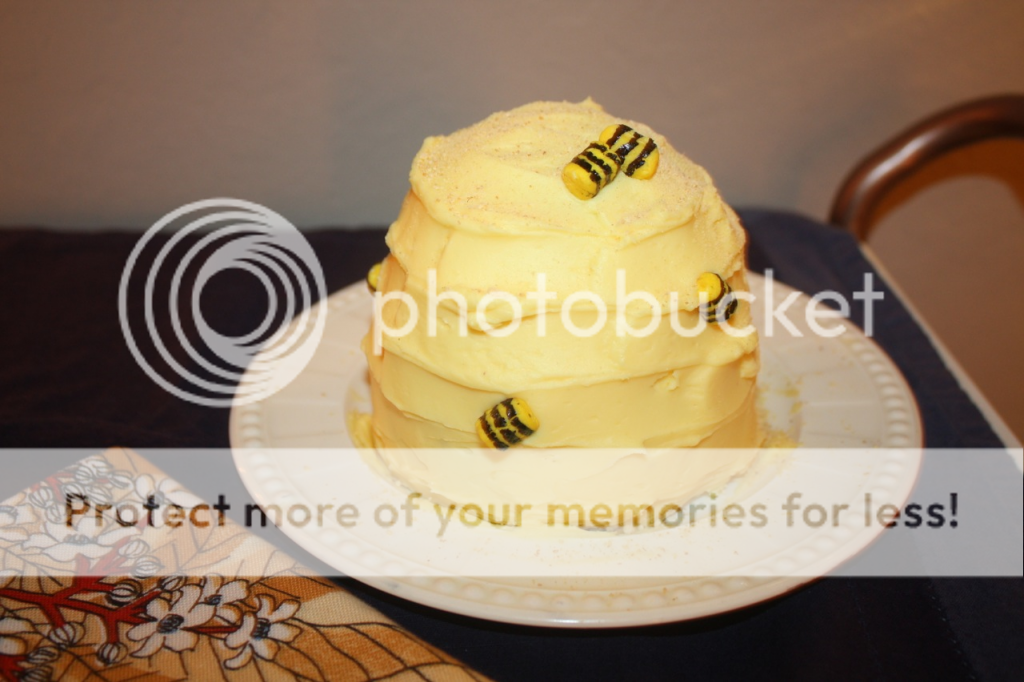
  4. Apply a very thick layer of icing (not perfect, just relatively even) all around the cake. Starting at the center of the top of the cake, use a small spatula or the back of a spoon to create a spiral all the way down the cake. Press just enough that the spiral is visible. (If you mess up, just smooth it out and start over!)
I prepared the full amount of cake batter for a regular cake recipe, poured what I needed into the small pans and the bowls, and made cupcakes out of the rest. I sprayed both the cake pan and bowl with cooking spray.

For the bees, I actually rolled and shaped pieces of yellow licorice from a mixed licorice candy bag that we had at home. I painted the black stripes on with black gel food coloring. You can use fondant, if you have those skills, or get creative with other kinds of candy. Anything small, yellow, and edible can get striped with a paintbrush and food coloring!

For the cake, I just doctored up a devil's food cake mix with an extra egg, some sour cream, and instant chocolate pudding mix. For the frosting I used this vanilla buttercream.

I sprinkled some graham cracker crumbs on top for a little added texture and color.


Enjoy, and have a wonderful weekend!


Friday, November 29, 2013

DIY BOOKPAGE / SHEET MUSIC WREATH


Hello, dear readers! Hope you all are enjoying a wonderful Thanksgiving holiday.

I'm allowed to post about Christmas decorations now, right?! This wreath is actually from last year, but I never posted about it. The photos were taken in the summer, after the wreath had begun to fall apart... woops.

It was darling during Christmastime, but it's not too holiday-ish, so it was allowed to stay through summer :)


Here's what you need:
  • small circle of cardboard (mine was about 4 inches)
  • masking tape
  • pages from a book
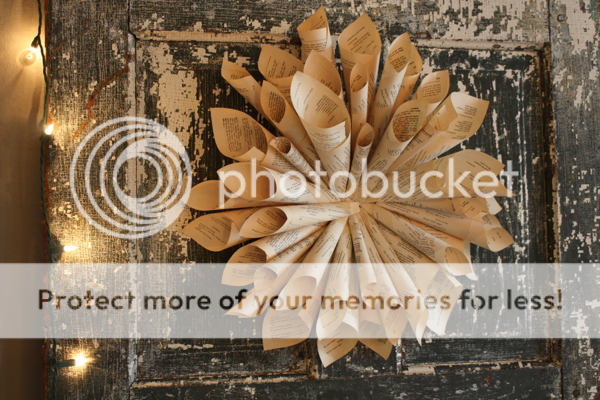
Just roll the pages into cones and tape them in place. Then use rolls of tape to attach a circular layer of cones to the cardboard. Add another layer, then add more to fill in. 

Masking tape is probably not the best bet for long-term attachment. I'd recommend a glue gun if you want the wreath to last a long time. Masking tape lasted me about 6 months before some rolls started falling off. 

Happy holiday decorating!


Friday, November 15, 2013

NOVEMBER DESSERTS & A FALL PLAYLIST

It's falltime, everyone :)

Last week my mom texted me that it's snowing for the first time in my hometown (in Illinois), and I felt pretty sad to be missing it. Sure, months of bitter cold can get unpleasant, but the first snow is just magical.

Meanwhile in Cali I eased my snow-sickness with a falltime stroll through beautifully changing trees. People complain that there aren't seasons here, but it's not true. The leaves on the trees change colors later in the year, and stay colorful longer, so there are practically months of watching red/orange/yellow/purple leaves float to the ground and then crunching through them. Yes, we're lacking the crispness in the air, but I'm mostly over that now :)


Okay onto food. I'm not the biggest pumpkin fan, but I got an urge to eat something really fall-ish (hence these pumpkin-maple-cinnamon cupcakes), which inspired me to share some of my favorite November desserts. All of these are great inspiration for Thanksgiving, of course, whether you're hosting a crowd, staying curled up at home, or have been tasked with bringing dessert to a gathering.


If you're really in a pickle and need a last-minute treat, or if you want to give a homemade gift but don't have a lot of time, I recommend Trader Joe's Pumpkin Bread Mix. It's $2.99, and it's yummy.

You should also check out my Caramel Apple Martini, which deserves to be enjoyed all the way through fall!

Last but not least, I'm sharing a fall playlist. I listen to a ton of music but don't usually make playlists for seasons like this. I've really enjoyed this one for getting me into a fall spirit, though. Hope you enjoy it, too!

If you have Spotify, here's a link to open the playlist in Spotify (it's called "falltime").

If you don't have Spotify, you can enjoy it here!

Wednesday, November 13, 2013

PUMPKIN CUPCAKES with MAPLE-CINNAMON CREAM CHEESE FROSTING


All right, dear readers. I'm not the biggest fan of pumpkin, but Jessica's pumpkin dream cake on The Novice Chef kind of made my mouth water, particularly the cream cheese frosting with maple syrup and cinnamon.


The cake is moist and dense, and it's really perfect with cream cheese frosting. However, if you're in it for the pumpkin, you should know the pumpkin flavor in these cakes is pretty faint. Just enough, and fantastic with the flavors in the frosting.


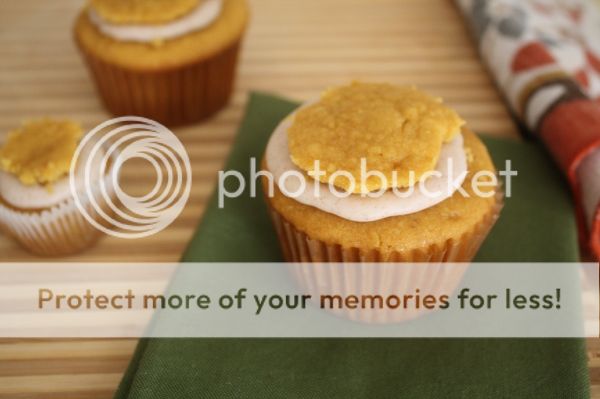
I'd planned to fill all of the cakes with the frosting (and not frost on top), but I got half way through the minis and stopped because the cake was a little too dense to fill by inserting a tip. So for the ones you see not frosted on top, I cut a conical chunk out of the top, filled it with frosting, and replaced the cone of cake.

As you can see, it looked pretty messy, so I ended up just frosting the rest.

Happy, fall, dear readers. Enjoy!


PUMPKIN CUPCAKES with MAPLE-CINNAMON CREAM CHEESE FROSTING

taken directly from Jessica's pumpkin dream cake over at The Novice Chef, except for the assembly/baking time

Cakes:
3 cups all-purpose flour
1 1/2 teaspoons baking soda
1/2 teaspoon salt
3/4 cup unsalted butter, softened
2 cups granulated sugar
3 large eggs
1 tablespoon vanilla extract
1 (15 oz) can pumpkin
1/4 cup vegetable oil
1 cup milk

Frosting:
12 oz (1 1/2 packages) cream cheese, softened
3/4 cup unsalted butter, softened
3 tablespoons pure maple syrup
2 teaspoons vanilla extract
2 teaspoons cinnamon
6 cups powdered sugar

In a medium bowl, mix flour, baking soda and salt. Set aside. In a large bowl/stand mixer, cream butter and sugar until light and fluffy. Beat in the eggs one at a time, then stir in vanilla, pumpkin and vegetable oil. Beat in the flour mixture alternately with the milk.

Bake at 300°F - standard for 18-20 minutes, mini for 12 - 14 minutes.

For the frosting: In a large bowl, cream butter and cream cheese until smooth. Beat in maple syrup, vanilla and cinnamon. Add confectioners' sugar and beat on low speed until combined, then on high until frosting is smooth.

UA-46365231-1